Behind the Lens

3 Mistakes that Keep you From Getting the Street Photos you Want
Do you ever feel like you aren’t getting the shots you would like as a street photographer?
This week’s YouTube video shares 3 mistakes or things you can do differently to prevent you missing the photos you want.
Walking too Fast - things happen in front of you, behind you, all around you when you are looking for a photograph. When you walk too fast you run the risk of missing out on something.
Not Staying Long enough in one spot - be patient, wait for things to develop. Even though you may have taken some photos in a spot, pay attention because if you linger a bit, something better may just materialize.
Don’t wear headphones - I love music and wearing headphones while I walk, but when I’m walking the streets with a [photography] purpose I don’t want to miss anything. A sound can tip you off to something happening around you that you can’t see. If the music prevents you from hearing, you may miss something good!
Definitely take a watch - and let me know what you think!

Street Photography Tip: Don’t be Nervous
Creating a YouTube channel for my street photography tips has been something I have wanted to do for awhile. It took me a awhile to get it started but - le voici. Here it is.
One of the most common questions I hear is about how to not be nervous when taking street photos. This is something that I think the newer street photographers struggle with and even us seasoned photographers occasionally get a little shy from time to time. This video is a short overview of what my take on this is: Don’t be Nervous.
Thanks for taking a look. I plan on releasing at least a couple a week discussing common questions I get asked. So if there is something you would love to hear more about, send me a DM on instagram. And while you are at it, please subscribe to my channel and watch a few of the videos. Appreciate it.

Composition: The Definition con’t
[question I get asked alot: What software do I use to edit my photos?] I’ll start with a few that are well known and can be checked with Lightroom or Capture One Pro. I use capture One Pro for almost all of my work but Lightroom is a wonderful program and has more composition overlays so it’s a better option for compositional aid flexibility.
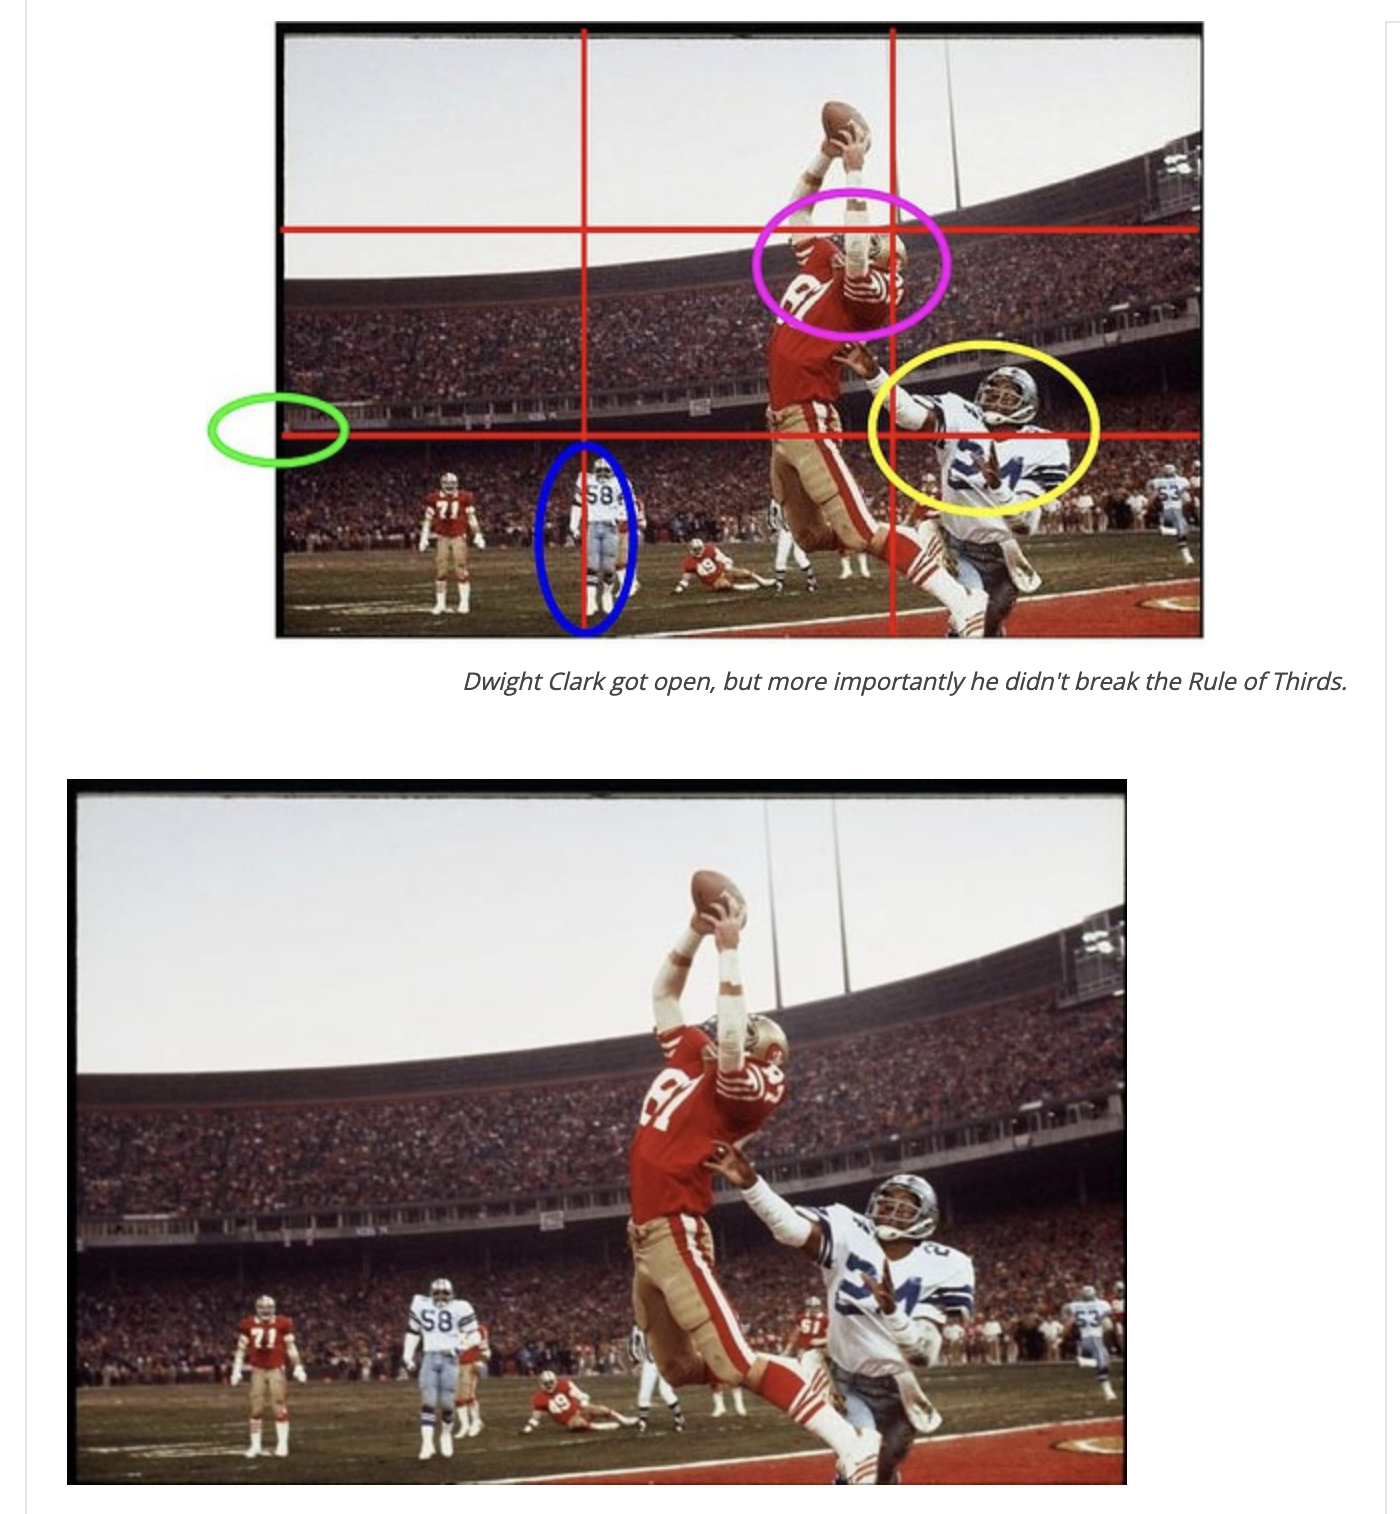
Let's start with the rule of thirds. It’s one of the easiest to learn and apply. It’s built into the display of most digital cameras and phone cams. It presents itself as a grid that annoys people that don’t know what it is. It lays across your image as a grid with two vertical and two horizontal lines. These section the image into thirds, going up and across.
The main idea is to place your points of interest on any of those lines and avoid the very center for placement of the main subject. Placement on the intersecting points is kind of extra credit. The idea behind this (and pretty much all the rules) is to give the brain a little workout.
The brain likes things to be easy. Once it’s figured out what’s going on it wants to move on to the next thing. Continuously looking at something when the brain is tapping its foot and wanting to move on is boring. With that in mind, the brain directs the eyes to certain points in any scene first. If it finds what it’s looking for there then it self satisfying wants to get on to the next thing. The points it sends the eyes to first are the center, and then to what is different. The center is obvious and what most of this is about but the concept of difference is interesting. If the image is predominantly dark then you will look at the lightest area first. Same in the opposite direction. Apply that to all sorts of things like color, quantity, focus etc. It’s built into us, don’t bother trying to change it. Understand and use it.
As for placement, when what’s most interesting isn’t in the center, your eyes start to wander. There are certain points in an image that seem to offer more visual tension and work the brain a bit harder (without it knowing it’s getting a workout) and that’s where the various placement guides come in.
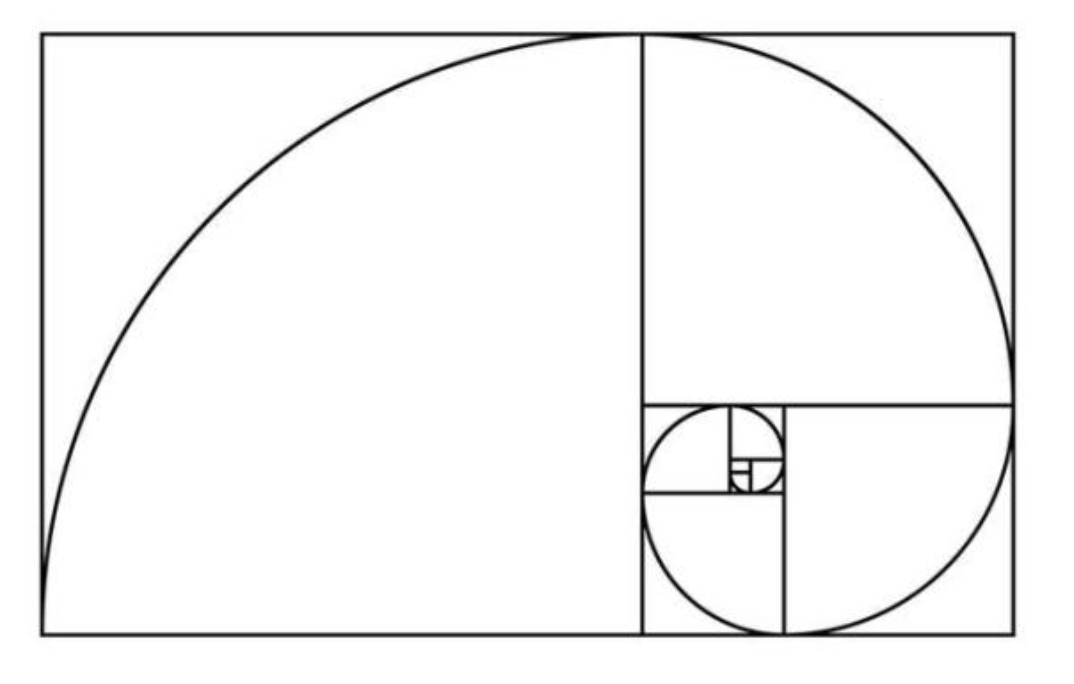
You’ll eventually start to see the relationship in real time and place your subjects according to what you become most comfortable with. I started with the rule of thirds and then moved onto the golden ratio and finally to the golden spiral (also known as the Fibonacci Spiral). The golden ratio is basically the rule of thirds without dividing the image equally.
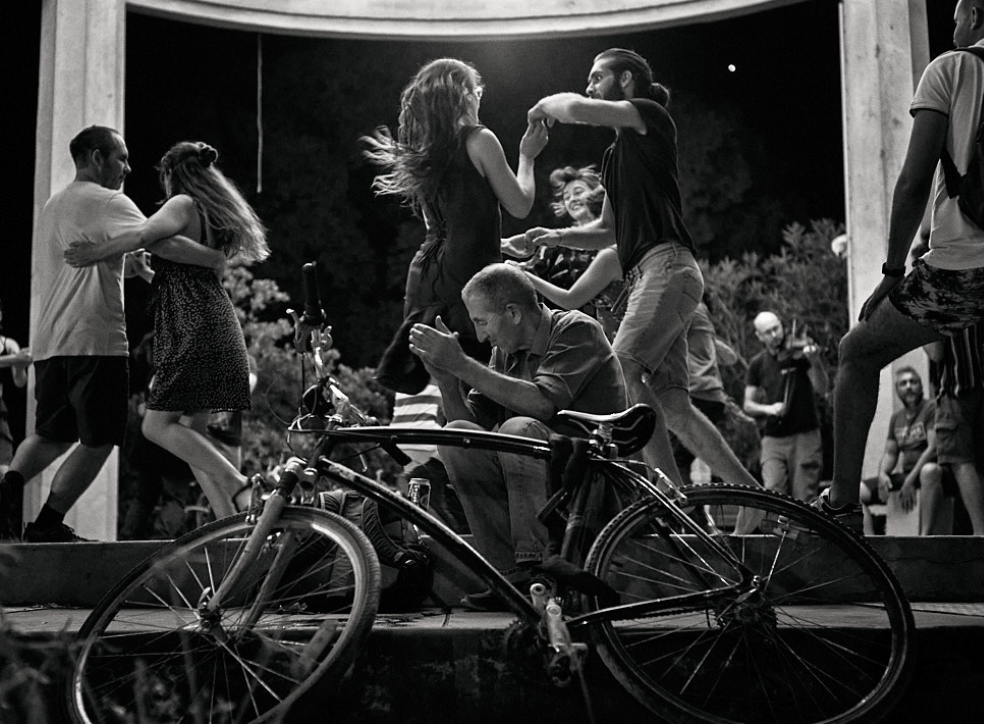
The Fibonacci Spiral seems impossible at first but with practice it becomes extremely useful. A quick story on the spiral. In the 80’s (when I was a kid) I saw a story about a cover of Sports Illustrated of “The Catch” . It was considered one of the best sports photos ever.
The question of course was why? It was a really good photo and it was hard to quickly look away from but again, why? The answer was Fibonacci. I had never heard of it or really cared since at the time I had zero idea that I would become a photographer. When the spiral was laid over the image, it was amazing.
Everything followed along the lines as if it were a painting and the photographer had time to place each element exactly in the perfect place. It was a single play in an NFC Championship game and of course the photographer (Walter Iooss, Jr.) reacted extremely quickly. He framed the shot as best he could given the speed it was happening.
Luckily as best he could turned out to be perfect in that instance. It could have turned out a lot differently and still have been a good shot but instead of good it was great. That is the importance of understanding composition. It can make good better and better great. You are still responsible for choosing the subject matter that gets composed. A bad subject with perfect everything else still won’t work of course. What is a good and bad subject is wildly subjective of course. That has no rules.
This article (or post if you prefer) isn’t intended to teach you how as much as why (with a little how sprinkled in). Why is always the most important question.
There is so much more to composition when you are interested and ready. It goes well beyond the simple guides I’ve mentioned, which are of great importance still. Let’s finish with a little assignment.
Put your favorite images into lightroom (since it has more options for composition tools) and cycle through the options. Don’t forget to invert them too since that is an option as well.
See if they line up with any of the tools, either perfectly or close (perfect isn't worth holding out for). Don’t stop thee. Crop into the image and see if you can get any of the other overlays to work.
You may find an image within the image you already like that is different and maybe even better. Once you get comfortable with the images you like (which may change in time btw) try images you thought didn’t make the cut.
Something in them made you take notice in the first place. It seriously is frequently in our subconscious. I reexamine images all the time and find relationships I didn't see at first. Cropping is our friend, embrace it.
The editors of Sports Illustrated did with “The Catch” and so have countless photographers and editors to refine amazing images over the years from good to great and great to legendary.

Composition: The Definition
What is composition in terms of photography?
For that matter, what is it at all?
Firstly I believe it is the word that turns off a lot of young and inexperienced photographers.
It sounds boring, technical and just plain “not fun”. All of that can be true.
The argumentative rule breakers will say that it’s not necessary to know because we’ve all heard that rules are meant to be broken so why not just proceed from there?
It seems logical enough until you start getting into it. You may have a natural eye for design and create a lot of images that you and others love. Cool.
Like in music. You listen and then play without knowing anything about music theory. It sounds good therefore it is good. If it looks good, it is good.
While true, it misses the point that you are still applying the rules of your art.
Once you get to a point where you care and start to notice the patterns of your work you’ll start to notice those same patterns in the work of many others that you didn’t think had any relation to you.
Now you are starting to understand there are forces at work that you can’t ignore forever.
There are reasons that go beyond the scope of this post that people like things. Whether art or other things, the composition of the thing in question will attract some, go unnoticed by some and even repel others.
Once you’ve figured out what those things are then you are closer to being able to consciously expand your repertoire.
The first definition (of many) I ran across online from the Oxford English Dictionary states that “it is the nature of something's ingredients or constituents; the way in which a whole or mixture is made up”.
In photography, whether street or otherwise, the placement of the objects in your photo in relation to each other and their location within the frame is what we are talking about.
There are time tested “rules” governing everything from color relationships, luminance values and object placement that have made photographs and paintings before them compelling to look at.
It’s not random even if it seems so. If you are feeling a bit “cheeky” you can go and look at a lot of your favorite photos (paintings are relevant too) and see if you can notice what makes them similar even in seemingly dissimilar images.
If you are doing this I would strongly suggest you compare similar subject matter to begin with. It’s not very straightforward at first.
There are alot of things that can go into the composition of an image and I am not going to address all of it here. I will get you started and add more in another post.
Don’t worry though, you don’t have to cram them all into every image.
For what it’s worth, I have never seen an image in any medium that contained (or could contain) all the rules at once.
to be continued….

Street Photo Tip: Work the Scene

In general street photography happens fast.
You see something that triggers a response, you raise your camera to your eye, (extremely) quickly compose, release the shutter and move on because that moment is gone forever.
The sequence is obviously slightly but inconsequentially different for hip shooters. With that in mind, let's think about what we would do if instead of seeing a moment unfold on the fly, we find an object that is drawing our attention. Something odd or at least noteworthy and it is stationary. You have more time to be careful in your composition.
Same with scenes where you have the frame precomposed but wait on various people (or animals) to walk into and complete the scene. If this is the case, one and done should not be your operating method.
Work the scene. Change angles. Walk around. Wait for various elements to change places and fill spaces. Create choices for yourself later when editing.
If you are not in a hurry and you walk off from something that caught your attention, wasn’t leaving anytime soon and didn’t care that you were photographing it without taking the time to try a few different things then you’ll be extra frustrated when editing and finding that a better image would have been made if you had only done.
A famous example is Jeff Mermelstein’s photo of burning shoe. If you don’t know it then it’s worth looking at and remembering what I just typed. You can also watch his segment in the documentary “Everybody Street”. Totally worth watching if you haven’t already (the whole thing, not just Jeff’s part).
Better than 95% of everything I photograph (street photography wise) is on the move and I get between 1-3 frames (more often than not it’s 1-2) and I'm on to the next moment. I have successfully photographed still objects in very few frames and unsuccessfully in many.
Given the choice, I still think it’s better to give yourself options than move on quickly if you don’t have to. Keep this in mind when you see that next object or scene that captures your attention.

Street Photo Tip: Icebreaker for Street Portraits
Here's a quick tip that I think would benefit all street photographers to some degree but would be particularly helpful to those that engage their subjects more, like doing street portraits.
Make a business card for yourself.
Include a sentence saying that if they contact you you’ll send them a digital copy of the image/s. Include your contact info and your social media profile/s. I have all this laid over an image that has a lot of dead space but still represents what I do.
When I approach a person, I either already have it out or I reach for it shortly after I begin talking to them. It’s a gesture that gains trust but allows for them to get something back for the time they gave you. Make sure of course to respond and fulfill your promise to get an image back to them.
Luckily, you can get inexpensive business cards easily.
Upon moving to France, I had a stack made in French so I didn’t have to rely on relaying all the correct information in a language that I still haven’t mastered or asking them to understand english.
Keep a few in your wallet at all time and look forward to having to restock them. This of course helps build followers to your socials too. It’s an inexpensive win in every direction.

Street photo tip: Don’t stand out.
Street photo tip: Don’t stand out.
I know that it goes against everything we’re told as people and artists and pretty much every endeavor. We should aim high as possible and stand out from the crowd. That’s still true but from a results standpoint. Street photographers are observers. We are not participants. We don’t aim to change the world but to document it.
Through documentation change can be made but not directly. It’s similar, but without being creepy to a spy. It should be obvious that spy’s (with the exception of James Bond) are discreet. They observe and collect data while drawing as little attention as possible. Attention changes the dynamic. Luckily, if we get caught doing our thing there are no major repercussions therefore this is where our spy analogy ends.
When you are gearing up for your walkabout, whether in a new location or the one you frequent most, don’t dress to impress. Don’t stand out. Be comfortable and mobile. Don’t wear what you might on a day or at a time when you are looking to attract the attention of those around you. Even if you choose to make street photography social, don’t tip your hand until you are ready. You don’t carry a sign that says “Hello, I am a street photographer, don’t mind me, just go on about your business”. If you dress in a way that draws attention to you and the camera in your hand then you may as well have the sign and take the guesswork away.
![[Tip] look at as much street photography as you can handle.](https://images.squarespace-cdn.com/content/v1/6144e9277e413c6c3a6487b0/1686058528890-6I5ZH3U3NPISOTGWW82U/man+in+bathrobe+with+pipe+L1003996.jpg)
[Tip] look at as much street photography as you can handle.

Absorb a lot of street photography.
I can handle a lot and so, I am sure, can you. It’s not just fun and inspiring but it starts to inform how you see. Not just from one perspective but many. It doesn’t make you any of the people whose work you observe but it starts to help you align the elements of what you see in ways you may not have otherwise thought of.
Look at all the work you can. Your tastes in the subject will undoubtedly transform and the work you wished you could produce may no longer speak as loudly as that of one that you didn’t formerly understand. It’s all good. You’ll see things you want to do done by some and things you’ll want to avoid done by others. With repeated and varied viewing you will incorporate a great many things without even noticing (for a while at least).
Don’t worry about copying. You can't copy street photography.
Each image and each moment are unique. They only happen just like that - one time ever.
You can copy a technique but when, where and how you apply it are yours. Add all the influences together with a healthy dose of you and your backstory - and the mix you get will be uniquely you.
It takes a while until it is more easily recognised as you but it most certainly is.
I look at street photography all the time (as well as many other genres that I like) and I know I have been heavily influenced.
My preferred viewing is of the classics. I hesitate to say masters due to the fact that there are some great photographers today that have mastered their subject. Classics are of course masters but you know they are older and have stood the passage of time.
As for copying, don’t worry. You can only really be inspired by the work of another street photographer as I mentioned earlier.
Each of the people you are inspired by was in turn inspired by someone else. Even at the beginning of the photographic age, photographers were inspired by painters and even, I imagine, writers.
Many if not all of the greats acknowledge their inspirations.
Having said all that, there is no substitute for practice. You have to create an awful lot of images to get to the point where you aren’t thinking but doing.
One day someone will ask how you know what to photograph, where to place the subject(s) and many other things and they’ll want to know how you do it so quickly and effortlessly.
When that happens remember to tell the truth, you were inspired by many and you walked a lot (usually with a camera).

Zone Focusing
This is one of the handiest things I ever learned.
I use it everyday with my Leica but I also used it a lot with my Pro auto focus cameras when using my 24 and 25mm lenses which have depth of field scales.
Most lenses these days are autofocus and they don’t bother with depth of field scales on their lenses anymore since so few people care to focus manually. Some thankfully do. You don’t need the scale for manually focusing directly of course.
Where it is so useful is when you want to set the focus BEFORE you bring the camera to your eye. When you prefocus on a given area (zone), whatever falls in that distance is more or less in focus.
There is only ever one point (distance) that is ever critically sharp but if it falls within the preset zone it is usually considered acceptably sharp for most purposes.
If absolute sharpness is your goal then zone focusing may not be for you. It worked for an awful lot of historic photos by legendary photographers but then nothing is for everyone and you may not even like the photos I’m thinking about. If that’s the case of course then you probably haven’t read to this point.
Now let's cut to the how to.
First choose an aperture. It doesn’t really work for wide open apertures as there is too little depth of field to work with. I typically choose f8. You can go even smaller if you want more. It is surprising how much more you get per stop.
Next, notice the scale that doesn’t move at the base of the lens. It will have a center point, likely represented as an arrow (but may just be a line). That is the actual focus point. The point of critical focus. It doesn't really matter that much for this but it’s good to know what things are in my opinion.
I’ll use a 35mm lens as a reference since it is my go to focal length for street photography. The principle applies to all focal length lenses with a depth of field scale just with different distances aligned to the f stops.
Now, with the lens at f8 consider what you are about to photograph.
Say you're walking along a busy street and you intend to photograph things/people on your side of the street. If you align the 15(feet) with the line coming from the 8 on the right side of the lens*, then the 8 on the left* side will be just to the right of the 5(feet) mark. That means that now your camera is set to photograph (in focus) anything that is between approximately 5.5 feet to 15 feet away. That is a lot of area and a very useful range for the situation.
All you have to do now is bring the camera to your eye and shoot.
This is the only way to shoot from the hip and get anything in focus routinely.
Another term that you may hear, hyper focal distance, is the same principle with one difference. It is the point where everything from a certain point to infinity is focused. I use that a lot. Most of the time in fact. I have the camera set at the hyper focal distance for my 35mm at f8 and I have it in hand and ready to go.
If I see something I am ready to photograph it. If I can get more time to do more photos then I will likely start to specifically focus on the subject. Having the camera ready to capture anything immediately without much thought or prep helps immensely since more often than not, my subjects are in motion and the moment only lasts a second or two.
When you get comfortable with zone focusing, you will be ready to release the shutter and walk on faster than any autofocus would allow.
Auto focus is great for a lot of things. I don’t think it has an advantage in street photography though and in some instances I feel it’s a liability. I hope this helped. If you have any questions feel free to ask.
*not all lenses focus by turning in the same direction. If yours is different then the principle is the exact same but you’ll align near and far on the opposite side of the scale.

Using a slow shutter speed…
Using a slow shutter speed to capture movement. Everyday street photography, me walking my hometown streets of Montpellier France.
This photo is some peak action skateboarding fun. This was shot after I left the really nice, main branch of the Montpellier library with a few really good monographs featuring, Cartier-Bresson, Elliot Erwitt, Sergio Larrain and Peter Lindburgh.
There are always (at least when I've been there) skaters in the space between the library and the amazing public pool.
A note about the shot for those that may wonder how it's done in camera.
Focus is set ahead of time. Use a slow shutter speed and follow the action. Trigger the shutter and continue your follow through. The follow through portion is more important than it sounds.
Trial and error is your friend here. The slower the shutter the more surrealistic and unexpected (and many unusable) images you get.
It's a risk, reward thing so start on something unimportant.
I've been doing it for years and it's a trick I go to fairly often when the situation is right.
Keep playing and never stop learning.

Street Photography Ethics (mine anyway!)
I present a lesson on what I see as street photography ethics (just one of many ethical points in the genre I might add and a full on topic in my upcoming street photography course in May). Ethics and adherence to them vary of course. That said, let's begin.

I present a lesson on what I see as street photography ethics (just one of many ethical points in the genre I might add and a full on topic in my upcoming street photography course in May). Ethics and adherence to them vary of course. That said, let's begin.
What about this shot makes me think of ethics?
It's the bottle next to this photogenic man.
Would removing it make for a better image? Uncertain. Possible.
Could I have moved? Yes (but the light was perfect for here and I like the background).
Could I have moved the bottle? Possibly, but that would require way to much scenic manipulation for my taste and the possibility of the gentleman just saying no for something that isn't important.
I could have moved in and cropped tighter except that I like(d) the extra context of his environment with this crop.
Could I just remove it in post? Absolutely not! Not in my ethical model anyway. To remove something by way of editing software or any other means (other than cropping) is changing the reality of the moment and therefore creates something that never really existed. That goes against everything I believe in street and documentary photography.
If you are creating images as fine art and don't really care about the reality of the moment then feel free to do what you wish. I choose to let things remain as they are and work with or around them.
Cropping isn't unethical as it doesn't change anything. It simply acts the same as moving closer or farther back. You can crop in camera or in post and the basic effect is the same (differences due to perspective perhaps but no manipulation of reality).
The bottle in question was his and as such can be a part of his story (whatever story that is).
Leave it, crop it or move on to the next pic and count this as one of the many that just wasn't good enough to show. The choice is yours.
Over the years, countless images have gone unseen because of something I could change. That's just how it is.

I identify with black and white photography (can you tell?)
If you look at my instagram feed for even a minute (actually less) you'd guess correctly that I identify with black and white photography to a great extent.
That said, I do actually see in color (even though I am lacking in some of the greens, browns and reds) and am moved to action by it when I feel it calls strongly enough. This is one of those times.
This is a baggage claim area in Marseille’s international airport.
The color grabbed me immediately and as happens often, I asked my family to hold on a moment while I explored.
I was not only taken by the colour (I like the English spelling) but how lonely the space looked inspite of the vibrance of the palette.
If you know remedial color theory then you know that warm colors (as shown here) are meant to make you feel better, more comfortable and cozy.
That being the case, why does it seem to make this empty space all the more stark? Something to ponder (or not).

Have your camera ready at all times
Street Photography 101: Have your camera ready at all times.

A quick shot from my recent walk through the Marais quartier in Paris this past week.
I am among the first to tell anyone who will listen that they should take as many exposures as necessary to get the shot. If the scene allows then you should work it from different angles until you are sure you've got the best image possible.
That said, I am surprised at how many of my favorite photos are one offs. Something happens, I bring the camera up, snap and done. The scene dissolves. I wish I had another shot but I don't. This is an example of just that. I'm not saying it’s a career best but I like it enough to show it obviously.
There's a point to me laying this out of course.
You have to have your camera ready. If it's turned off, if it's hanging loosely at your side then you are likely to miss many more shots. It not only has to be turned on but in hand and ready to go.
Life on the streets happens quickly. Even slow things pop up fast and dissolve faster than you can bring the camera to eye if its just hanging there.
This is where the size of your camera starts to make a difference too. It's not just that a big camera draws more suspicion but the weight ads up after a while. Small cameras are easier to carry for long periods and they don't draw as many eyes.
I won't tell you what camera to use (even though I am partial to Leica) but I will definitely tell you to have it ready unless you want to miss something. ⠀

How to determine camera position
Where was the camera positioned in this shot? If you know how to tell then you can begin figure out how some of your favorite photos were made. Let's begin to break it down.

Where was the camera positioned in this shot?
If you know how to tell then you can begin figure out how some of your favorite photos were made. Let's begin to break it down. You can tell that the shooting angle was low mainly because of how much of the underside of his chin and nose you can see.
Assuming he and I were the same height, I wouldn't see much if any of the underside of either. Another clue is that the camera appears to be pointed slightly upward.
Sometimes it's obvious and other time not as much.
One tell is when a camera is pointed up from level, vertical lines (buildings are a good indicator) tilt outward at the top toward the frame edges. This is called keystoning. If pointed down the the lines point in at the top and expand at the bottom. This of course is easier to see when the horizon is straight but you can see it if you try.⠀⠀⠀⠀⠀⠀⠀⠀⠀
⠀⠀⠀⠀⠀⠀⠀⠀⠀
If your favorite photographer consistently shoots from a low angle on the street there is a good chance they are shooting without looking through the viewfinder (sometimes referred to as Shooting From the Hip). If you are trying to emulate them and can't figure out whats wrong then eliminating one of the variables (a big one) will help.
Let me know if you have any questions on this. It seems straight forward to me but then again I know what I was trying to say.

Patience…
The moral of the story would seem to be that smiles open doors that otherwise may be closed. Smiling more never hurt anyone. It makes you feel good at the least and makes others feel good too. Point 2 (or 1a) is that it doesn’t hurt to talk to strangers.

This is one of those ads you know is going to lead to a photographic moment. It just takes patience. Of course in a busier city the wait time typically goes down but there is still a wait. Patience is a virtue. A number of people passed by but I felt something was still missing. So I waited a little while longer and voila! This guy came by.
Street photography requires a number of things. Patience is one. A big one. If you don't have it then street photography is either going to wear it into you or you will end up with another creative outlet. I'll leave you with that.