Behind the Lens

3 Mistakes that Keep you From Getting the Street Photos you Want
Do you ever feel like you aren’t getting the shots you would like as a street photographer?
This week’s YouTube video shares 3 mistakes or things you can do differently to prevent you missing the photos you want.
Walking too Fast - things happen in front of you, behind you, all around you when you are looking for a photograph. When you walk too fast you run the risk of missing out on something.
Not Staying Long enough in one spot - be patient, wait for things to develop. Even though you may have taken some photos in a spot, pay attention because if you linger a bit, something better may just materialize.
Don’t wear headphones - I love music and wearing headphones while I walk, but when I’m walking the streets with a [photography] purpose I don’t want to miss anything. A sound can tip you off to something happening around you that you can’t see. If the music prevents you from hearing, you may miss something good!
Definitely take a watch - and let me know what you think!

Composition: The Definition con’t
[question I get asked alot: What software do I use to edit my photos?] I’ll start with a few that are well known and can be checked with Lightroom or Capture One Pro. I use capture One Pro for almost all of my work but Lightroom is a wonderful program and has more composition overlays so it’s a better option for compositional aid flexibility.
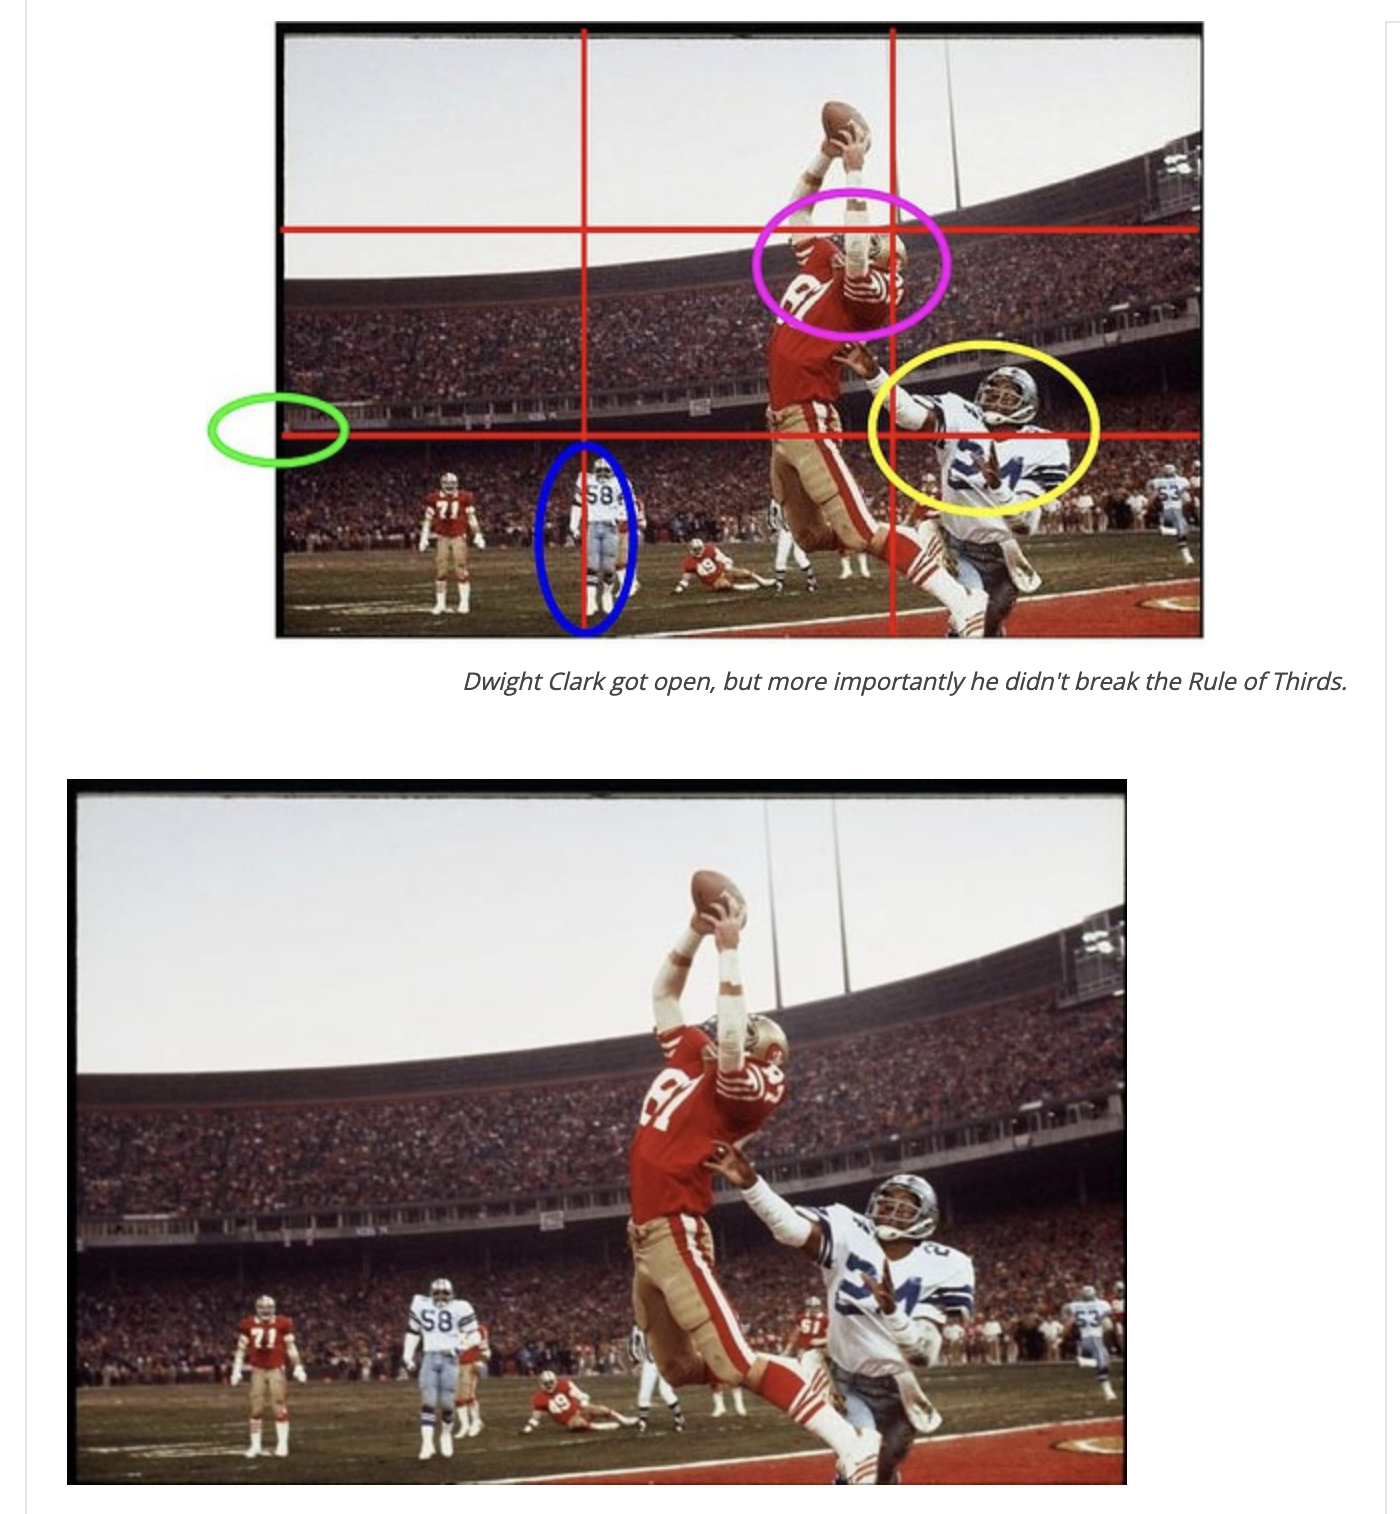
Let's start with the rule of thirds. It’s one of the easiest to learn and apply. It’s built into the display of most digital cameras and phone cams. It presents itself as a grid that annoys people that don’t know what it is. It lays across your image as a grid with two vertical and two horizontal lines. These section the image into thirds, going up and across.
The main idea is to place your points of interest on any of those lines and avoid the very center for placement of the main subject. Placement on the intersecting points is kind of extra credit. The idea behind this (and pretty much all the rules) is to give the brain a little workout.
The brain likes things to be easy. Once it’s figured out what’s going on it wants to move on to the next thing. Continuously looking at something when the brain is tapping its foot and wanting to move on is boring. With that in mind, the brain directs the eyes to certain points in any scene first. If it finds what it’s looking for there then it self satisfying wants to get on to the next thing. The points it sends the eyes to first are the center, and then to what is different. The center is obvious and what most of this is about but the concept of difference is interesting. If the image is predominantly dark then you will look at the lightest area first. Same in the opposite direction. Apply that to all sorts of things like color, quantity, focus etc. It’s built into us, don’t bother trying to change it. Understand and use it.
As for placement, when what’s most interesting isn’t in the center, your eyes start to wander. There are certain points in an image that seem to offer more visual tension and work the brain a bit harder (without it knowing it’s getting a workout) and that’s where the various placement guides come in.
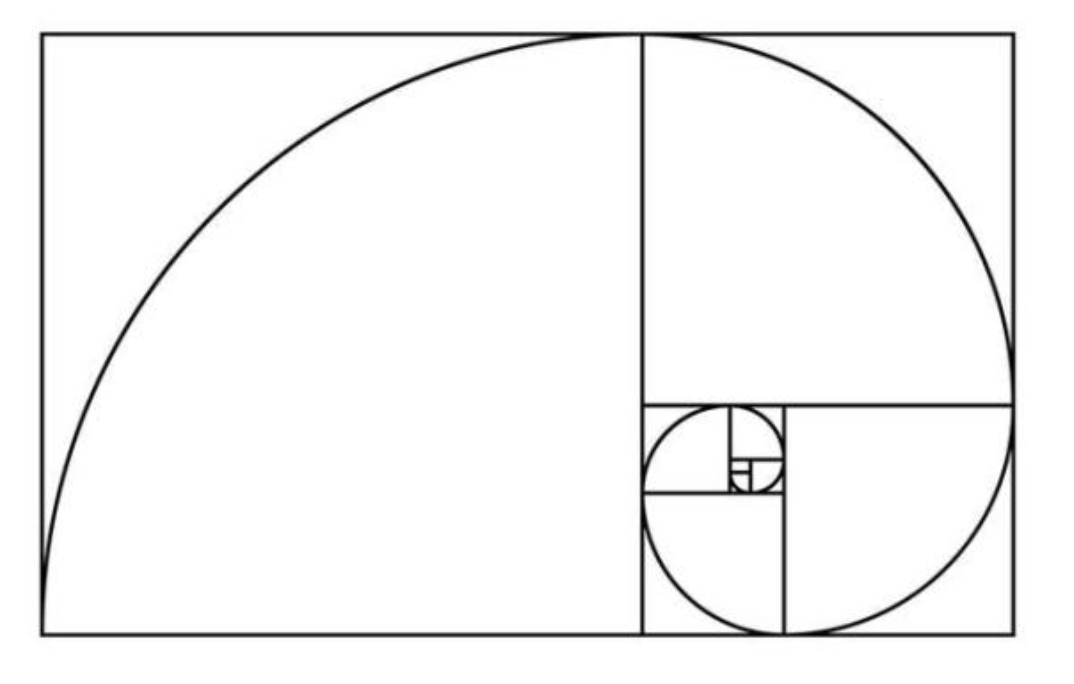
You’ll eventually start to see the relationship in real time and place your subjects according to what you become most comfortable with. I started with the rule of thirds and then moved onto the golden ratio and finally to the golden spiral (also known as the Fibonacci Spiral). The golden ratio is basically the rule of thirds without dividing the image equally.
The Fibonacci Spiral seems impossible at first but with practice it becomes extremely useful. A quick story on the spiral. In the 80’s (when I was a kid) I saw a story about a cover of Sports Illustrated of “The Catch” . It was considered one of the best sports photos ever.
The question of course was why? It was a really good photo and it was hard to quickly look away from but again, why? The answer was Fibonacci. I had never heard of it or really cared since at the time I had zero idea that I would become a photographer. When the spiral was laid over the image, it was amazing.
Everything followed along the lines as if it were a painting and the photographer had time to place each element exactly in the perfect place. It was a single play in an NFC Championship game and of course the photographer (Walter Iooss, Jr.) reacted extremely quickly. He framed the shot as best he could given the speed it was happening.
Luckily as best he could turned out to be perfect in that instance. It could have turned out a lot differently and still have been a good shot but instead of good it was great. That is the importance of understanding composition. It can make good better and better great. You are still responsible for choosing the subject matter that gets composed. A bad subject with perfect everything else still won’t work of course. What is a good and bad subject is wildly subjective of course. That has no rules.
This article (or post if you prefer) isn’t intended to teach you how as much as why (with a little how sprinkled in). Why is always the most important question.
There is so much more to composition when you are interested and ready. It goes well beyond the simple guides I’ve mentioned, which are of great importance still. Let’s finish with a little assignment.
Put your favorite images into lightroom (since it has more options for composition tools) and cycle through the options. Don’t forget to invert them too since that is an option as well.
See if they line up with any of the tools, either perfectly or close (perfect isn't worth holding out for). Don’t stop thee. Crop into the image and see if you can get any of the other overlays to work.
You may find an image within the image you already like that is different and maybe even better. Once you get comfortable with the images you like (which may change in time btw) try images you thought didn’t make the cut.
Something in them made you take notice in the first place. It seriously is frequently in our subconscious. I reexamine images all the time and find relationships I didn't see at first. Cropping is our friend, embrace it.
The editors of Sports Illustrated did with “The Catch” and so have countless photographers and editors to refine amazing images over the years from good to great and great to legendary.
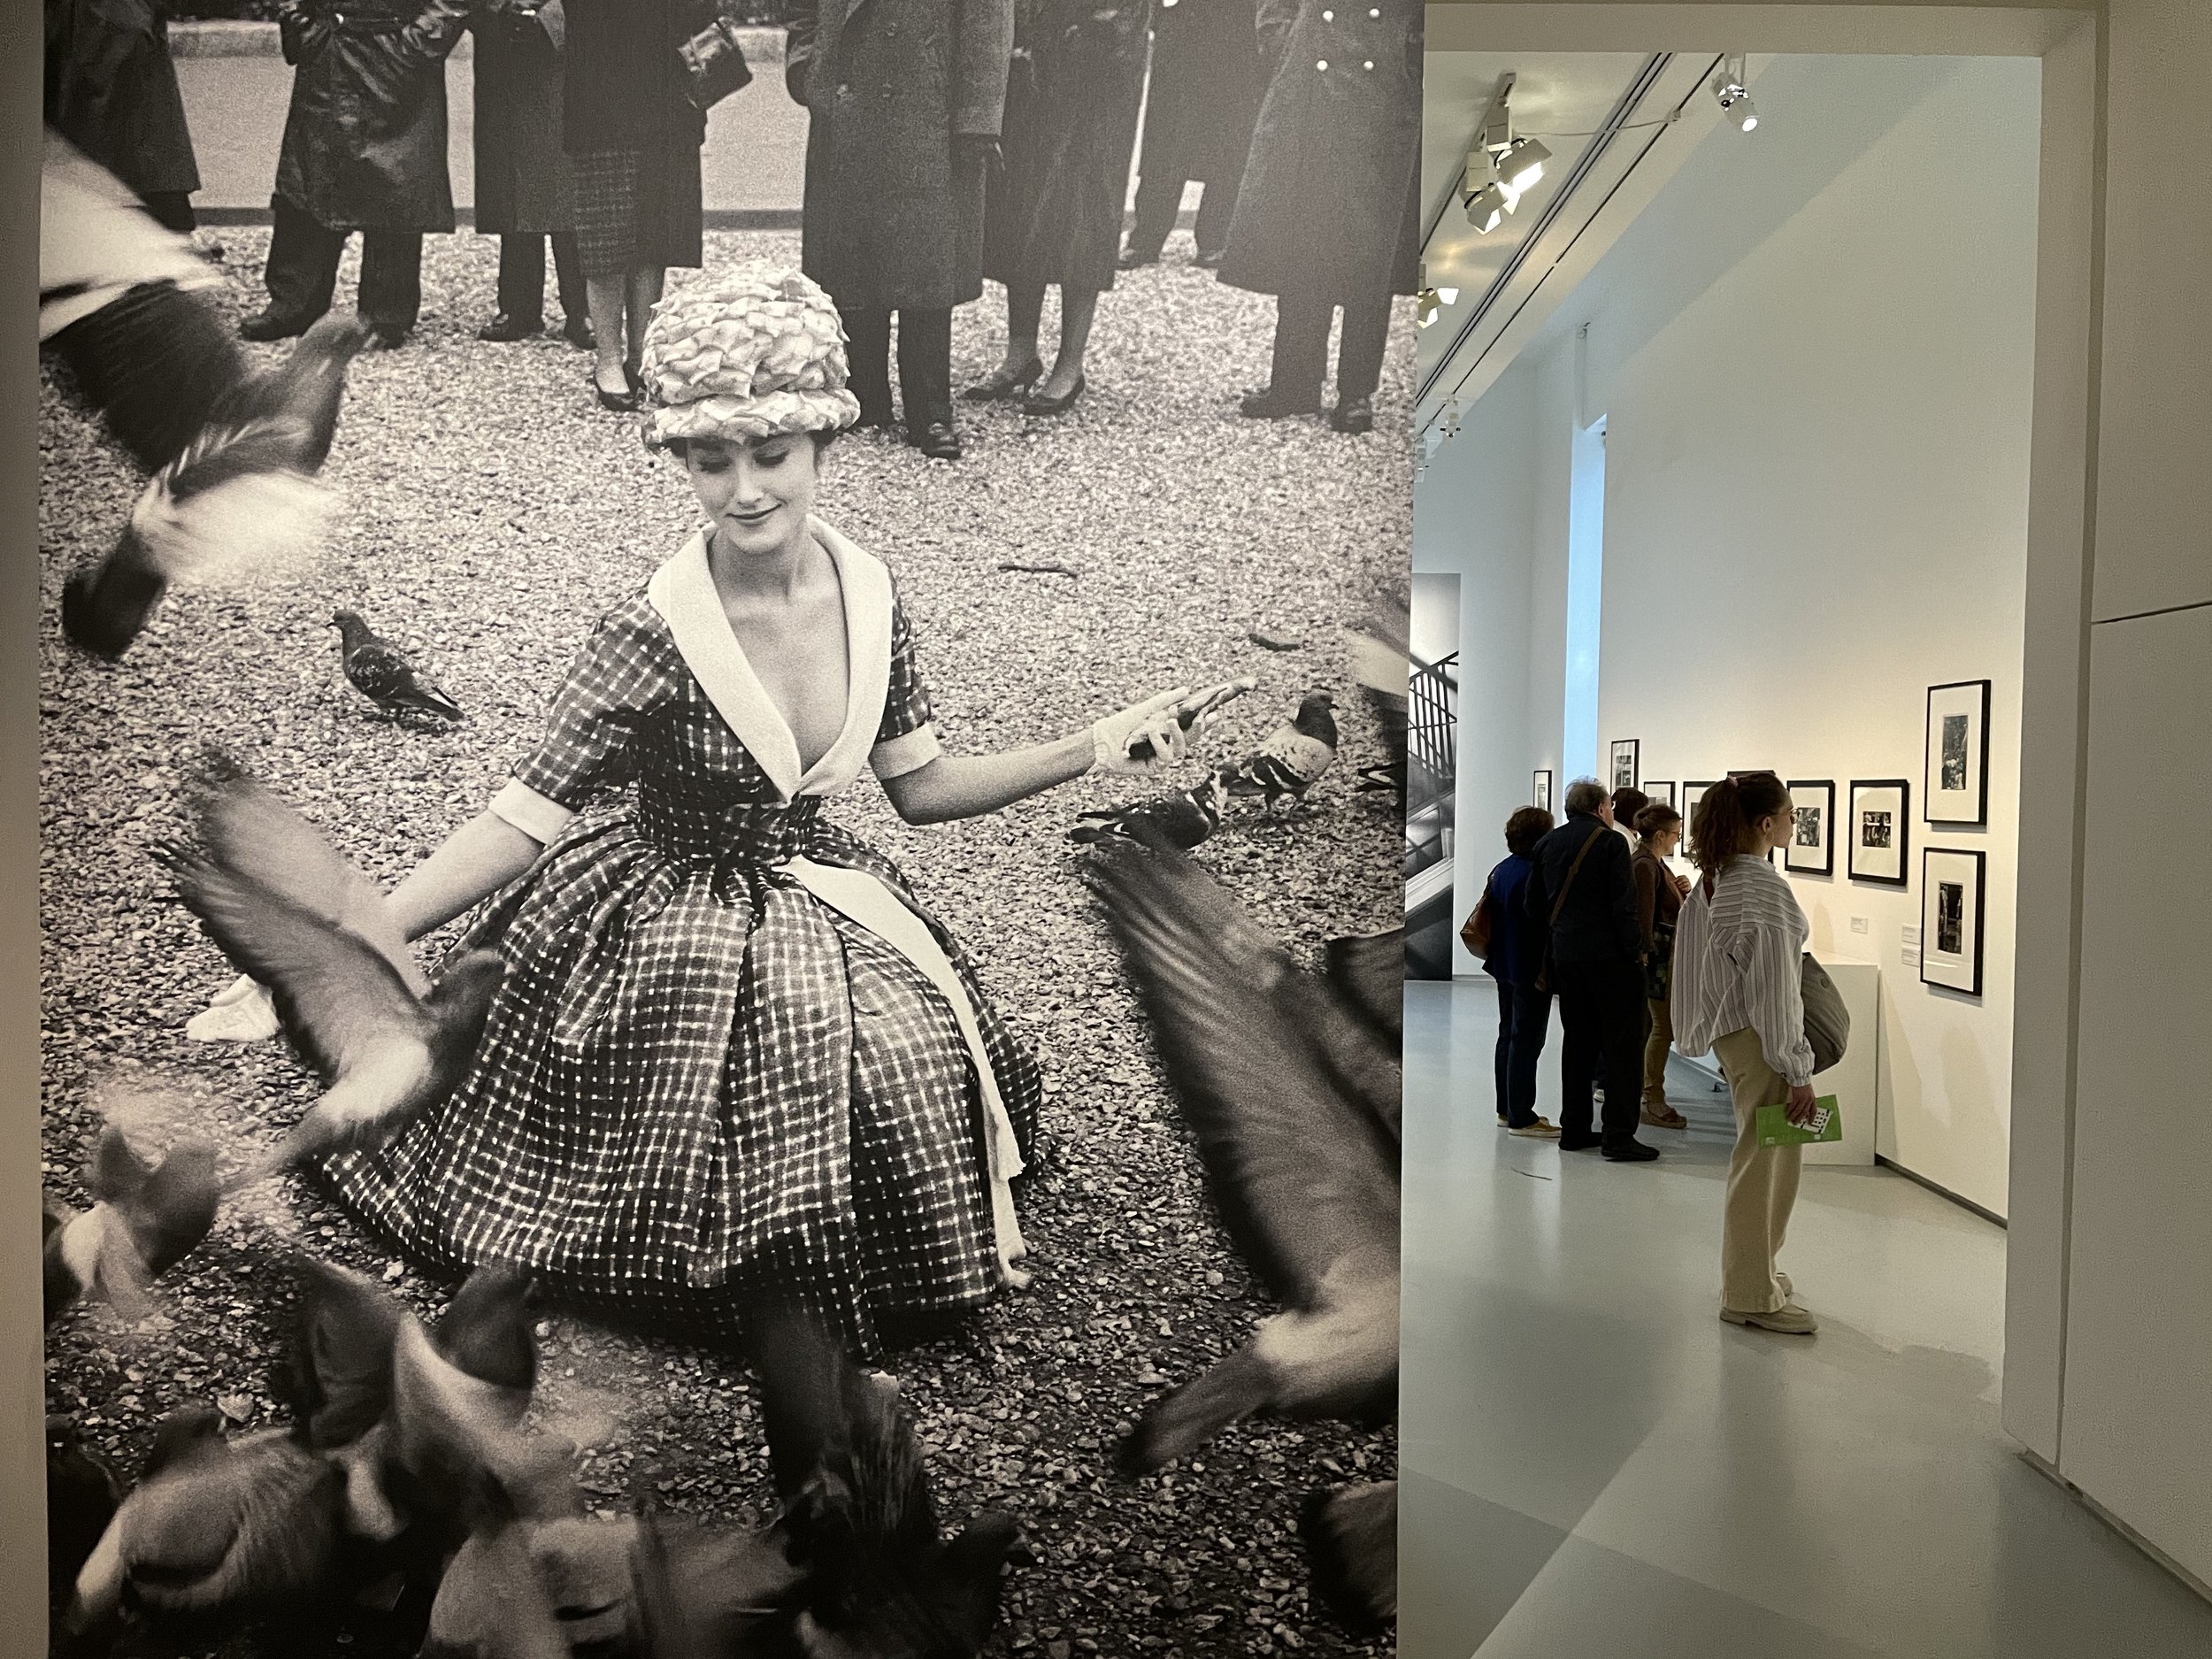
Frank Horvat, Paris, le monde, la mode

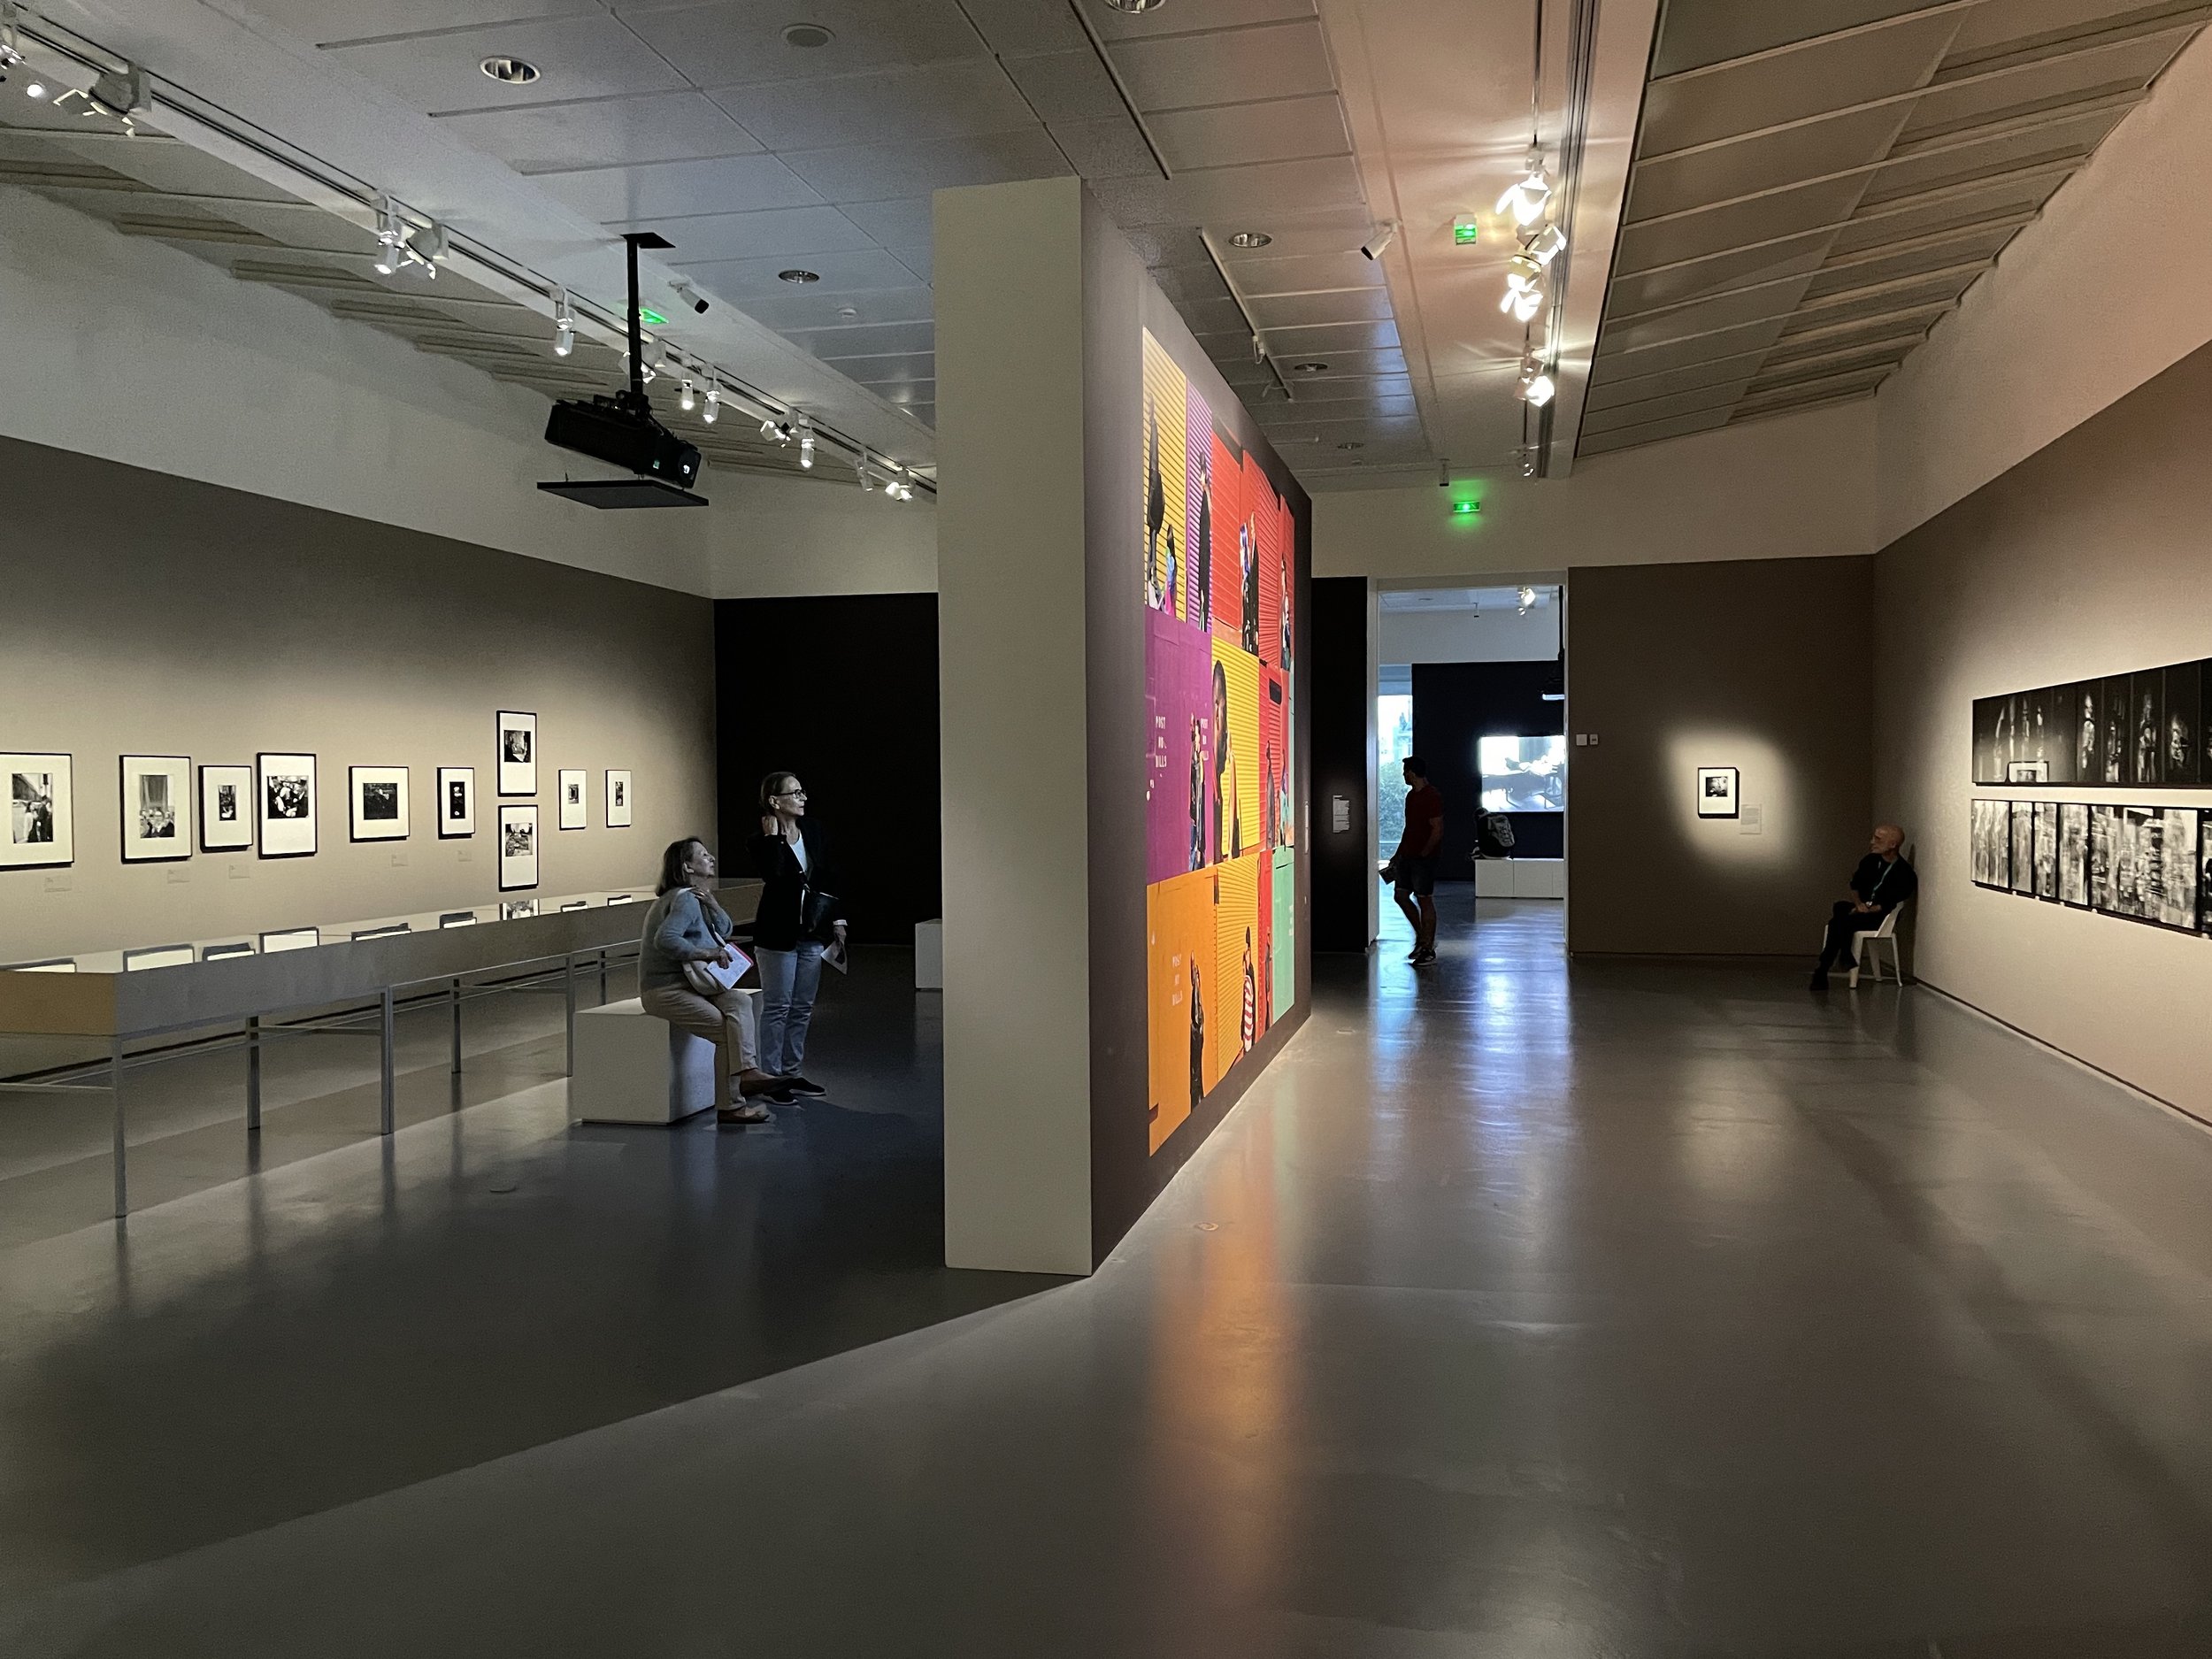
Had a few days in Paris last week and very glad that I was able to get to one of my favorite spots in Paris for photography. Excellent exhibition of both Frank Horvat + Johan van der Keuken at Jeu de Paume in Paris. If you are in town before mid September, don’t miss it!

‘If you can’t do this, you’re in the wrong business’
If you are an avid street photographer fan and are looking to watch something good, don’t miss Cheryl Dunn’s excellent documentary on New York street photography, “Everybody Street.” It is already almost 10 years old but it is still so fresh.
The film features a who’s who of iconic NYC street photographers - it is an outstanding look into my favorite subject.
I included here part of the interview with Ricky Powell - and he sums up towards the end - in a great line about street photography how easy it is to have a camera on your at all times. Watch if you can, if not here’s the quote below. But it is much more fun hearing his NY accent and him demonstrating for the camera just how damn easy it is to have a camera on you at all times.
Perfection.
from Ricky Powell:
“There's no reason I shouldn't have a camera.
All I had to do was this.
If you can't do this, if this is too much,
then, ya know, I was in the wrong business”.
Everybody Street Instagram
Everybody Street Website

Street photo tip: Don’t stand out.
Street photo tip: Don’t stand out.
I know that it goes against everything we’re told as people and artists and pretty much every endeavor. We should aim high as possible and stand out from the crowd. That’s still true but from a results standpoint. Street photographers are observers. We are not participants. We don’t aim to change the world but to document it.
Through documentation change can be made but not directly. It’s similar, but without being creepy to a spy. It should be obvious that spy’s (with the exception of James Bond) are discreet. They observe and collect data while drawing as little attention as possible. Attention changes the dynamic. Luckily, if we get caught doing our thing there are no major repercussions therefore this is where our spy analogy ends.
When you are gearing up for your walkabout, whether in a new location or the one you frequent most, don’t dress to impress. Don’t stand out. Be comfortable and mobile. Don’t wear what you might on a day or at a time when you are looking to attract the attention of those around you. Even if you choose to make street photography social, don’t tip your hand until you are ready. You don’t carry a sign that says “Hello, I am a street photographer, don’t mind me, just go on about your business”. If you dress in a way that draws attention to you and the camera in your hand then you may as well have the sign and take the guesswork away.
![[Tip] look at as much street photography as you can handle.](https://images.squarespace-cdn.com/content/v1/6144e9277e413c6c3a6487b0/1686058528890-6I5ZH3U3NPISOTGWW82U/man+in+bathrobe+with+pipe+L1003996.jpg)
[Tip] look at as much street photography as you can handle.

Absorb a lot of street photography.
I can handle a lot and so, I am sure, can you. It’s not just fun and inspiring but it starts to inform how you see. Not just from one perspective but many. It doesn’t make you any of the people whose work you observe but it starts to help you align the elements of what you see in ways you may not have otherwise thought of.
Look at all the work you can. Your tastes in the subject will undoubtedly transform and the work you wished you could produce may no longer speak as loudly as that of one that you didn’t formerly understand. It’s all good. You’ll see things you want to do done by some and things you’ll want to avoid done by others. With repeated and varied viewing you will incorporate a great many things without even noticing (for a while at least).
Don’t worry about copying. You can't copy street photography.
Each image and each moment are unique. They only happen just like that - one time ever.
You can copy a technique but when, where and how you apply it are yours. Add all the influences together with a healthy dose of you and your backstory - and the mix you get will be uniquely you.
It takes a while until it is more easily recognised as you but it most certainly is.
I look at street photography all the time (as well as many other genres that I like) and I know I have been heavily influenced.
My preferred viewing is of the classics. I hesitate to say masters due to the fact that there are some great photographers today that have mastered their subject. Classics are of course masters but you know they are older and have stood the passage of time.
As for copying, don’t worry. You can only really be inspired by the work of another street photographer as I mentioned earlier.
Each of the people you are inspired by was in turn inspired by someone else. Even at the beginning of the photographic age, photographers were inspired by painters and even, I imagine, writers.
Many if not all of the greats acknowledge their inspirations.
Having said all that, there is no substitute for practice. You have to create an awful lot of images to get to the point where you aren’t thinking but doing.
One day someone will ask how you know what to photograph, where to place the subject(s) and many other things and they’ll want to know how you do it so quickly and effortlessly.
When that happens remember to tell the truth, you were inspired by many and you walked a lot (usually with a camera).

Zone Focusing
This is one of the handiest things I ever learned.
I use it everyday with my Leica but I also used it a lot with my Pro auto focus cameras when using my 24 and 25mm lenses which have depth of field scales.
Most lenses these days are autofocus and they don’t bother with depth of field scales on their lenses anymore since so few people care to focus manually. Some thankfully do. You don’t need the scale for manually focusing directly of course.
Where it is so useful is when you want to set the focus BEFORE you bring the camera to your eye. When you prefocus on a given area (zone), whatever falls in that distance is more or less in focus.
There is only ever one point (distance) that is ever critically sharp but if it falls within the preset zone it is usually considered acceptably sharp for most purposes.
If absolute sharpness is your goal then zone focusing may not be for you. It worked for an awful lot of historic photos by legendary photographers but then nothing is for everyone and you may not even like the photos I’m thinking about. If that’s the case of course then you probably haven’t read to this point.
Now let's cut to the how to.
First choose an aperture. It doesn’t really work for wide open apertures as there is too little depth of field to work with. I typically choose f8. You can go even smaller if you want more. It is surprising how much more you get per stop.
Next, notice the scale that doesn’t move at the base of the lens. It will have a center point, likely represented as an arrow (but may just be a line). That is the actual focus point. The point of critical focus. It doesn't really matter that much for this but it’s good to know what things are in my opinion.
I’ll use a 35mm lens as a reference since it is my go to focal length for street photography. The principle applies to all focal length lenses with a depth of field scale just with different distances aligned to the f stops.
Now, with the lens at f8 consider what you are about to photograph.
Say you're walking along a busy street and you intend to photograph things/people on your side of the street. If you align the 15(feet) with the line coming from the 8 on the right side of the lens*, then the 8 on the left* side will be just to the right of the 5(feet) mark. That means that now your camera is set to photograph (in focus) anything that is between approximately 5.5 feet to 15 feet away. That is a lot of area and a very useful range for the situation.
All you have to do now is bring the camera to your eye and shoot.
This is the only way to shoot from the hip and get anything in focus routinely.
Another term that you may hear, hyper focal distance, is the same principle with one difference. It is the point where everything from a certain point to infinity is focused. I use that a lot. Most of the time in fact. I have the camera set at the hyper focal distance for my 35mm at f8 and I have it in hand and ready to go.
If I see something I am ready to photograph it. If I can get more time to do more photos then I will likely start to specifically focus on the subject. Having the camera ready to capture anything immediately without much thought or prep helps immensely since more often than not, my subjects are in motion and the moment only lasts a second or two.
When you get comfortable with zone focusing, you will be ready to release the shutter and walk on faster than any autofocus would allow.
Auto focus is great for a lot of things. I don’t think it has an advantage in street photography though and in some instances I feel it’s a liability. I hope this helped. If you have any questions feel free to ask.
*not all lenses focus by turning in the same direction. If yours is different then the principle is the exact same but you’ll align near and far on the opposite side of the scale.
Why I choose Leica
Let’s agree that a camera is just a tool to create an image. There are many, and their strengths differ. Some feel good in my hand and not so good in yours. The camera (tool) you choose is a personal choice and as long as it gets you what you want then it’s silly to argue against it.
With that out of the way I’ll explain my personal choice for those that are looking to buy into rangefinders in general and Leicas more specifically. I’ll go point by point but in no specific order. First, I use Leica M’s for my street photography. I have an M3 from the late 1950’s which I don’t use nearly as much anymore due to the outrageous cost of film and the subsequent costs in time and money of the development and scanning. I love film (I started when it was the only option) but I use it rarely these days. I also have an M10P and an M10 Monochrom.
The rangefinder experience is really the make or break feature of the Leica M’s. Looking through the viewfinder is nothing at all like SLR’s or modern mirrorless cameras. What you see is not what you get. No matter what lens you put on the camera, the view doesn’t change. It’s the same whether or not it's a 21mm or a 135mm lens. In order to frame your subject correctly, a set of framelines appears in the viewfinder that corresponds to the lens you have mounted. Why I like that is that it allows you to see more than your lens sees and therefore allows you to see what’s happening just outside of the frame. It helps to anticipate action. You know if someone or something is about to enter and you can anticipate where in the image you want that subject to be before you activate the shutter. The performance cost of course is that since you are using just a portion of the finder for the lens, the frame lines are smaller for each progressively larger focal length. It gets pretty small when you are at the far end of the built in lens frame spectrum (135mm). If I were using long lenses a lot then I likely wouldn’t be in love with rangefinder based cameras.
My favorite part of the rangefinder window, which can be found similarly in the Fuji x100 and XPRO series is that everything appears in focus regardless of whether or not the lens is actually focused and it doesn’t indicate the depth of field in any way. Why this is a benefit is that it really makes you take notice of your composition. With an SLR you typically see the view as if it were at maximum aperture and depending on the subject, and the lens choice (everyone lusts after the widest apertures in order to blowout any and all backgrounds and therefore not really worry about what’s in the scene. It’s an easy trick. It’s also a potentially boring trap that I fell into for a really long time. It’s a one trick pony as they say. When you start to compose as if everything is there and in focus then you start to choose more interesting/more complex compositions and your choice of aperture becomes an additional component to your image and not the sole determining factor that it so often seems is the case with so many photographers. To throw myself into the mix, one of my best friends used to joke with me and remind me that there were other aperture choices on my lens. I left it open wide all the time. I feel personally that once I learned to compose as if everything were visible and focused I became a better photographer. It opened a new compositional realm to me. As an illustration to the point (not me becoming better), if you look back at the most famous photos in history and nearly all Pulitzer prize winning photos, very few out of the overall group were shot wide open. There is a great amount of depth of field. The compositions were carefully chosen and the resulting images went on to be remembered by us all. That doesn’t mean everything has to be shot at f8 or higher. It just means that even the softer focused parts of the image will be arranged more carefully and contribute when possible.
Now as far as focussing goes, it just takes getting used to. It’s manual as I mentioned earlier. In the center of the viewfinder there is a small rectangular patch which is brighter than the rest of the window. In order to focus, you place the bright patch on the object you want to focus on. As you turn the focusing ring, you’ll begin to see a ghost image of what you are trying to focus on and start moving toward the center of the patch. To achieve focus, you place the ghost image on top of the object you are focusing on until the two appear sharp and perfectly lined up with each other. It gets easy with practice. A serious benefit with this method of focussing is how low the light can be and you can still focus with no problem. I’ve quickly focused a Leica in a dark room that gave my auto focus Sony A73 trouble (with a fast lens).
Another thing that isn’t a benefit or a feature but is real none the less is how good they look and feel. There is something that goes even beyond that. Something that just calls to you to use one. To carry it everywhere while your lage lensed dSLR or simple SLR for that matter, stay at home, in the bag. Part of it of course has to be the history of them. The amazing photographs made by historic photographers in all kinds of situations and various genres. If they did it, I want to as well. I’ll reiterate what I said in the beginning, cameras are tools. I choose to use the one that makes me happy. I can get results out of lots of different cameras. There is no perfect camera, just the camera that’s perfect for you. For me that’s my Leica(s). For others it is not and I am happy if they are happy.
Regardless of the system you are thinking of switching from or adding to, there is a learning curve. It requires more thought and in the beginning that will hinder you. Like driving a car. Until you've got some miles out of it you're not really comfortable and therefore you can’t get the best performance out of it. Use it awhile and without really noticing, you start to do things more intuitively and suddenly the performance potential is realized and you are not looking back.
I get nothing for saying any of this other than satisfaction if it helps anyone make a decision one way or the other. If you have any questions, feel free to ask. I’m happy to share what I’ve learned over the course of a long life and career with cameras.
Why I use Leica
First things first. A camera is a tool. A particular camera doesn’t make you a better photographer just by using it.
I do think certain aspects of various cameras provide benefits for the photographer using them but only if you actually need it. For instance, great low light ability is wonderful for me but fairly useless for someone who has chosen to only shoot landscapes in the daylight.
Now with that out of the way, let me tell you a story.
I’ve been photographing since I was a kid. I’ve been a professional photographer since maybe my early/mid 20’s back in the 90’s. I started with Pentax, moved to Canon for a long time and then switched to Sony for technical reasons at the time which have now been addressed by Canon (too late for me though).
For most of my adult life I’ve been drawn to the masters of street and documentary photography. Many (not all) used Leica rangefinder cameras for their work. It piqued my interest but I was happy with my camera(s) and I couldn’t justify the price for what I was doing (and getting paid at the time).
I began shooting more street photography as personal work to keep my head clear and my love of photography intact. With that, I began to crave a Leica again.
This time I had more reason but I still wasn’t being paid for it. It was personal.
I found a wonderful alternative. I bought a brand new Zeiss Ikon and a 50mm lens (which happens to have the same mount as the Leica M). It was great. I learned everything I needed to know about rangefinders and I didn’t break the bank.
That said, I still kept looking at Leicas. One day in a camera store in Scottsdale, AZ I had my Ikon over my shoulder and struck up a conversation with a photographer who worked there. He had an M6 and wondered why I had bought a new Zeiss. I told him all the wonderful things about my new love and he told me, you're going to buy a Leica eventually so why not start now (he wasn’t trying to sell me one either).
I think I told him he was wrong and that I’m more pragmatic. He was right though. There is something magical (because I can’t fully explain it) about a Leica M. From the look to the feel and of course the lineage.
Would the old masters that I looked up to use one now when there are so many choices? Who knows. They would use whatever made them happy the same way that I do.
I have used many different systems and shot all sorts of things in my lifetime. I have bonded with many cameras and not others (I’m looking at you Sony) but nothing has really ever made me just feel as happy to hold (talking cameras here) as a Leica.
I have 3 at the moment, an M3, M10P and an M10M. I don’t see needing another for a long time (or ever) since they are so good now and built so well. Who knows though. They are like beautiful watches and cool old cars. I’m not a collector of anything. I only buy things I want to use. I use the M10s daily. More than any camera I’ve ever had. One of them is with me everywhere.

Using a slow shutter speed…
Using a slow shutter speed to capture movement. Everyday street photography, me walking my hometown streets of Montpellier France.
This photo is some peak action skateboarding fun. This was shot after I left the really nice, main branch of the Montpellier library with a few really good monographs featuring, Cartier-Bresson, Elliot Erwitt, Sergio Larrain and Peter Lindburgh.
There are always (at least when I've been there) skaters in the space between the library and the amazing public pool.
A note about the shot for those that may wonder how it's done in camera.
Focus is set ahead of time. Use a slow shutter speed and follow the action. Trigger the shutter and continue your follow through. The follow through portion is more important than it sounds.
Trial and error is your friend here. The slower the shutter the more surrealistic and unexpected (and many unusable) images you get.
It's a risk, reward thing so start on something unimportant.
I've been doing it for years and it's a trick I go to fairly often when the situation is right.
Keep playing and never stop learning.

Street Photography Ethics (mine anyway!)
I present a lesson on what I see as street photography ethics (just one of many ethical points in the genre I might add and a full on topic in my upcoming street photography course in May). Ethics and adherence to them vary of course. That said, let's begin.

I present a lesson on what I see as street photography ethics (just one of many ethical points in the genre I might add and a full on topic in my upcoming street photography course in May). Ethics and adherence to them vary of course. That said, let's begin.
What about this shot makes me think of ethics?
It's the bottle next to this photogenic man.
Would removing it make for a better image? Uncertain. Possible.
Could I have moved? Yes (but the light was perfect for here and I like the background).
Could I have moved the bottle? Possibly, but that would require way to much scenic manipulation for my taste and the possibility of the gentleman just saying no for something that isn't important.
I could have moved in and cropped tighter except that I like(d) the extra context of his environment with this crop.
Could I just remove it in post? Absolutely not! Not in my ethical model anyway. To remove something by way of editing software or any other means (other than cropping) is changing the reality of the moment and therefore creates something that never really existed. That goes against everything I believe in street and documentary photography.
If you are creating images as fine art and don't really care about the reality of the moment then feel free to do what you wish. I choose to let things remain as they are and work with or around them.
Cropping isn't unethical as it doesn't change anything. It simply acts the same as moving closer or farther back. You can crop in camera or in post and the basic effect is the same (differences due to perspective perhaps but no manipulation of reality).
The bottle in question was his and as such can be a part of his story (whatever story that is).
Leave it, crop it or move on to the next pic and count this as one of the many that just wasn't good enough to show. The choice is yours.
Over the years, countless images have gone unseen because of something I could change. That's just how it is.

Paris Street Photography Workshop
The main goal of this street photography workshop is to learn or further expand skills to create powerful photos telling a story. Join Keith in Paris for this one-of-a-kind photographic adventure from May 5 to May 9, 2023. And, learn more about yourself, life, and your craft in the process.

Session: May 5th-9th, 2023
The main goal of this workshop is to learn or further expand skills to create powerful photos telling a story of people and the places they live, and building a camaraderie with fellow photographers that share a passionate curiosity of street photography. We’ll be documenting the essence of local life, one frame at a time, and having fun along the way.
The workshop will include daily meetings at the flat for coffee and discussion, small, intimate classes expressing the nuances of street photography, reviews and group edits of photos daily, and many miles of walking the streets of Paris practicing our craft. We’ll wrap the experience with a final show of images and a photographic review of the adventures along the way.
Keith’s photography career began in 1995. As a professional photographer for over 28 years, his knowledge of the craft, and added passion for it, is a great repository of information containing what it takes to make it as a photographer and to create meaningful art. His life experiences from growing up in the Bronx in New York City, to his world travels as a corpsman in the U.S. Navy, and his international work as a professional photographer come together to frame a unique view of the human condition, complete with all its nuances, as you’ll likely see in his personal work.
Join Keith in Paris for this one-of-a-kind photographic adventure from May 5 to May 9, 2023. And, learn more about yourself, life, and your craft in the process.

I identify with black and white photography (can you tell?)
If you look at my instagram feed for even a minute (actually less) you'd guess correctly that I identify with black and white photography to a great extent.
That said, I do actually see in color (even though I am lacking in some of the greens, browns and reds) and am moved to action by it when I feel it calls strongly enough. This is one of those times.
This is a baggage claim area in Marseille’s international airport.
The color grabbed me immediately and as happens often, I asked my family to hold on a moment while I explored.
I was not only taken by the colour (I like the English spelling) but how lonely the space looked inspite of the vibrance of the palette.
If you know remedial color theory then you know that warm colors (as shown here) are meant to make you feel better, more comfortable and cozy.
That being the case, why does it seem to make this empty space all the more stark? Something to ponder (or not).

Have your camera ready at all times
Street Photography 101: Have your camera ready at all times.

A quick shot from my recent walk through the Marais quartier in Paris this past week.
I am among the first to tell anyone who will listen that they should take as many exposures as necessary to get the shot. If the scene allows then you should work it from different angles until you are sure you've got the best image possible.
That said, I am surprised at how many of my favorite photos are one offs. Something happens, I bring the camera up, snap and done. The scene dissolves. I wish I had another shot but I don't. This is an example of just that. I'm not saying it’s a career best but I like it enough to show it obviously.
There's a point to me laying this out of course.
You have to have your camera ready. If it's turned off, if it's hanging loosely at your side then you are likely to miss many more shots. It not only has to be turned on but in hand and ready to go.
Life on the streets happens quickly. Even slow things pop up fast and dissolve faster than you can bring the camera to eye if its just hanging there.
This is where the size of your camera starts to make a difference too. It's not just that a big camera draws more suspicion but the weight ads up after a while. Small cameras are easier to carry for long periods and they don't draw as many eyes.
I won't tell you what camera to use (even though I am partial to Leica) but I will definitely tell you to have it ready unless you want to miss something. ⠀

How to determine camera position
Where was the camera positioned in this shot? If you know how to tell then you can begin figure out how some of your favorite photos were made. Let's begin to break it down.

Where was the camera positioned in this shot?
If you know how to tell then you can begin figure out how some of your favorite photos were made. Let's begin to break it down. You can tell that the shooting angle was low mainly because of how much of the underside of his chin and nose you can see.
Assuming he and I were the same height, I wouldn't see much if any of the underside of either. Another clue is that the camera appears to be pointed slightly upward.
Sometimes it's obvious and other time not as much.
One tell is when a camera is pointed up from level, vertical lines (buildings are a good indicator) tilt outward at the top toward the frame edges. This is called keystoning. If pointed down the the lines point in at the top and expand at the bottom. This of course is easier to see when the horizon is straight but you can see it if you try.⠀⠀⠀⠀⠀⠀⠀⠀⠀
⠀⠀⠀⠀⠀⠀⠀⠀⠀
If your favorite photographer consistently shoots from a low angle on the street there is a good chance they are shooting without looking through the viewfinder (sometimes referred to as Shooting From the Hip). If you are trying to emulate them and can't figure out whats wrong then eliminating one of the variables (a big one) will help.
Let me know if you have any questions on this. It seems straight forward to me but then again I know what I was trying to say.

Patience…
The moral of the story would seem to be that smiles open doors that otherwise may be closed. Smiling more never hurt anyone. It makes you feel good at the least and makes others feel good too. Point 2 (or 1a) is that it doesn’t hurt to talk to strangers.

This is one of those ads you know is going to lead to a photographic moment. It just takes patience. Of course in a busier city the wait time typically goes down but there is still a wait. Patience is a virtue. A number of people passed by but I felt something was still missing. So I waited a little while longer and voila! This guy came by.
Street photography requires a number of things. Patience is one. A big one. If you don't have it then street photography is either going to wear it into you or you will end up with another creative outlet. I'll leave you with that.